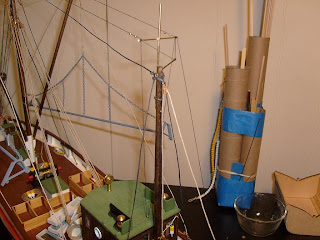
Preparing the nets was finished. after sewing them together, all the tiny excess "hairs" were trimmed away, careful as not to cut any filaments holding the stitching. I have the blue print of the Cux framed and on the wall by my table.....very handy for a quick reference. I might just keep it there.....looks kinda cool! while I was looking at it, I saw something that I had forgotten.....the antenna!
The antenna spans from mast to mast and has a small mast that juts from the back of the mizzen mast. I had some thin gauge black thread, just perfect for the task. I also noted that the "wires had these little "beads" on them. I didn't recall getting any of these in the kit......but no matter. the package of beads that I got to make the buoys, had these little beads included......probably to be used as spacers when these beads are strung. they would be perfect! the "wires" were strung, starting at the port side main mast. from there it went to the port side mizzen mast, and then to the small antenna mast, which then went to the starboard side of the mizzen mast. from there, it went back to the main mast......all the while, making sure that two "beads" were cemented at the "four corners". to string the wires to the pilot house, an eye bolt was installed on the roof. then from one side of the mizzen "cross", a wire was strung to the pilot house roof and then back up to the other side of the mizzen mast.
The antenna is complete....now, to transmit these pictures!
Another thing that I was concerned about, was the nets. the "mouth" of the net did not have the look of having a stable way to attach it to the net bars. although the net material seemed kind of stiff, the material itself was delicate and prone to filament breakage. I came up with an idea to "weave", instead of sew a thread lining around the mouth of the net, to reinforce it. I tried the hemp thread, but it was too stiff and the tiny "hairs" from it would catch on the filaments and break them.....I scratched that in a hurry! I then remembered that I still had some of the larger tan thread from the Cutty Sark model I was making, and used that, with much better results! I did not try to "wrap" the thread......it looked very messy. instead, I used the out to in, in to out method {much like basket weaving}, and carried on to the point where I met the other end.
at this time, I went a couple of weaves past it and seized them together, trimming the loose ends after the white glue had dried {I glued the knots}. it is also important to stay within the first two rows of the net material around the mouth. when it was done, a careful trimming removed all the broken filaments and hairs from the material, making it look a bit neater. and there you have it.....something to secure the nets to the bars!
the hemp thread is very nice, if you want to simulate rope.....but it only has one draw-back.....it is kind of stiff. I also coiled up the ropes that will originate at the back stay / shrouds and attach to the tail end of the nets. I glued one of them on the port side to see how it would look. on their way up from the coil, it must wrap around the belaying pin in the fife bracket......I don't think it will work.
Perhaps I will try to make them from the tan thread......back to the drawing board. AHOY!


